
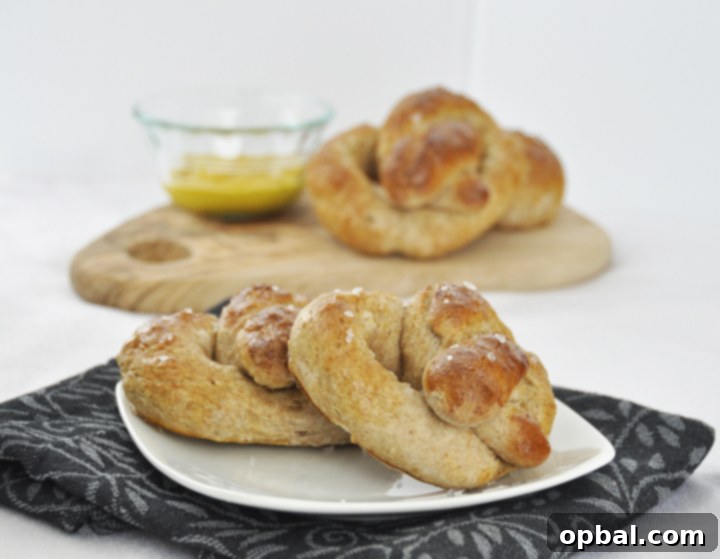
Indulge in the ultimate comfort food with these incredible 30-Minute Homemade Soft Pretzels. They boast the rich, chewy texture and delicious flavor you’d expect from an all-day baking project, yet magically come together in a mere half-hour! Perfect for satisfying your soft pretzel cravings – whether with a savory cheese dip or a sweet cinnamon sugar coating – these pretzels are an absolute game-changer for quick, gourmet-level snacking.
Unlock the Secret to Fast & Delicious Homemade Soft Pretzels
There’s a certain magic to a perfectly baked soft pretzel. Perhaps it’s the warm, pillowy dough, the satisfying chewiness, or the delightful crunch of coarse salt on top. For many, that magic often materialized during strolls through the mall, where the irresistible aroma of freshly baked pretzels from places like Auntie Anne’s would waft through the air. I’ll openly admit, I have a profound soft spot (pun intended!) for those sweet cinnamon sugar pretzel bites and the rich almond sugar pretzels – they’re truly a taste of pure, unadulterated indulgence. While I don’t give in to the temptation often, those special occasions where I do are savored, each bite a perfect balance of soft bounce and salty or sugary crust. It’s a nostalgic treat that brings instant comfort and joy.
Recreating that beloved experience at home always felt like a daunting task, a project reserved for long, lazy weekend afternoons. Traditional soft pretzel recipes, while undeniably rewarding, often involve multiple proofing stages, special ingredients, and a considerable time commitment that can stretch over several hours. So, imagine my delight and, honestly, a fair bit of skepticism, when I stumbled upon a soft pretzel recipe promising delicious results in just 30 minutes from start to finish! Having attempted homemade pretzels before, I knew the effort could be significant, even if the outcome was worth every minute. This ’30 Minute Homemade Soft Pretzels’ recipe seemed almost too good to be true, a culinary unicorn. My initial worry was that a quick version could never truly measure up to the authentic taste and texture of a slow-proofed pretzel. But let me tell you, just like with so many other culinary adventures, homemade reigns supreme once again. This recipe doesn’t just deliver on its promise of speed; it also provides all the delightful characteristics of classic soft pretzels without the lengthy wait. It’s truly a game-changer for anyone craving a quick and satisfying bite.
Versatility at Its Best: Perfect Pairings and Healthier Choices
One of the most appealing aspects of these homemade soft pretzels is their incredible versatility. They serve as a fantastic blank canvas for a myriad of flavors, allowing you to customize your snacking experience to perfectly suit your mood or occasion. Are you a fan of savory delights? Then pairing these warm, fluffy pretzels with your favorite creamy, cheesy dipping sauce is an absolute must. Think a rich, sharp cheddar dip, a tangy beer cheese sauce, a classic mustard cheese concoction, or even a simple warm marinara for an unexpected Italian twist. The saltiness of the pretzel perfectly complements these savory options. If your palate leans towards the sweeter side, prepare to be utterly amazed by these pretzels dipped in a rich cinnamon butter, a luscious honey mustard, or even a decadent chocolate ganache. The possibilities truly don’t stop there; a fruit jam, a powdered sugar glaze, or simply a sprinkle of cinnamon sugar can transform these into a dessert-worthy treat. Don’t be afraid to experiment and find your perfect “poison,” as the original recipe playfully suggests – the world of pretzel pairings is vast and delicious!
What makes this recipe even more universally appealing is its remarkable adaptability to dietary preferences and health-conscious choices. While traditional soft pretzel recipes often exclusively call for standard all-purpose flour, I opted to craft these particular pretzels with whole wheat flour. This simple substitution not only introduces a lovely, earthy, and slightly nutty flavor profile to the pretzels but also significantly boosts their fiber content, making them a slightly healthier snack option without compromising on that coveted soft, chewy pretzel texture. The whole wheat flour adds depth and a more wholesome feel. For those who prefer the classic, lighter taste and texture, fear not – regular unbleached all-purpose flour works beautifully too, yielding equally delicious results. These beautiful, golden-brown pretzels are more than just a quick snack; they can be a delightful and impressive appetizer for casual gatherings, a fun and interactive treat for kids (who often love helping with the shaping!), or a comforting bite to unwind with any evening of the week. Forget those often bland and rubbery store-bought frozen options; with this incredibly efficient 30-minute recipe, fresh, warm, and utterly delicious homemade pretzels are always within easy reach, anytime the craving strikes.
The Ultimate 30-Minute Homemade Soft Pretzel Recipe Guide
Quick & Easy Soft Pretzels: Ready in 30 Minutes!
This easy soft pretzel recipe proves that gourmet taste and texture don’t require gourmet time. Get ready to bake irresistible, warm pretzels in less than the time it takes to watch an episode of your favorite show!
Essential Ingredients for Your Perfect Soft Pretzels
- 1 and 1/2 cups warm water (lukewarm): The temperature of the water is absolutely crucial for activating the yeast. It should feel comfortably warm to the touch, similar to a baby’s bath, ideally between 105°F and 115°F (40°C-46°C). Water that is too hot will kill the yeast, preventing your dough from rising, while water that is too cold will inhibit yeast activation, leading to a dense pretzel.
- 1 packet active dry yeast (2 and 1/4 teaspoons): This is the powerhouse leavening agent responsible for giving your pretzels their incredibly soft, airy, and chewy interior. Ensure your yeast is active and fresh; check the expiration date. If your yeast doesn’t foam after a few minutes in warm water, it may be inactive, and you’ll need to use a new packet.
- 1 teaspoon salt: Beyond just adding flavor, salt plays several vital roles in dough. It balances the sweetness from the sugar, strengthens the gluten structure in the flour, and helps to control the yeast’s activity, preventing it from rising too quickly. Don’t be tempted to skip or drastically reduce it!
- 1 Tablespoon granulated sugar: This ingredient acts as food for the yeast, helping it to activate quickly and efficiently, which is key for a 30-minute recipe. Furthermore, sugar contributes to the beautiful golden-brown crust and imparts a subtle hint of sweetness that rounds out the pretzel’s flavor profile.
- 4 – 4.25 cups whole wheat flour (plus more for kneading surface): Whole wheat flour, as used here, adds a delightful nutty flavor and provides increased fiber, making these a more wholesome option. For a lighter, more traditional pretzel, you can certainly substitute unbleached all-purpose flour. The exact amount of flour needed can vary based on factors like humidity and the specific brand of flour, so it’s best to add it gradually until the dough reaches the correct consistency.
- 1 large egg: When beaten and used as an egg wash, this ingredient creates the essential shiny, deeply golden-brown crust that is characteristic of classic soft pretzels. It also acts as an adhesive, ensuring your coarse salt or other toppings stick perfectly to the dough.
- Coarse sea salt for sprinkling: The iconic finishing touch for savory pretzels! Its large, irregular crystals provide a satisfying textural crunch and burst of briny flavor with every bite. Pretzel salt or kosher salt are also excellent, readily available choices that provide similar results.
Step-by-Step Instructions for Quick Soft Pretzel Perfection
- 1. Prepare Your Workspace: Begin by preheating your oven to a high temperature of 425°F (220°C). This intense heat is absolutely essential for achieving that characteristic chewy interior and perfectly crisp, golden-brown crust on your pretzels. While the oven heats up, prepare your baking surface: line a large baking sheet with either parchment paper or a silicone baking mat. This crucial step prevents the pretzels from sticking and makes cleanup significantly easier. Set the prepared baking sheet aside, ready for your pretzel creations.
- 2. Activate the Yeast: In a generously sized mixing bowl, pour in the 1 and 1/2 cups of warm water. Carefully sprinkle the entire packet of active dry yeast over the surface of the water. Gently stir the mixture with a spoon for about 1 minute until the yeast begins to dissolve. It’s perfectly normal if a few small clumps of yeast remain; the primary goal is to largely integrate it into the water. Allow the mixture to sit undisturbed for 3-5 minutes. You should observe a slight foamy layer forming on top, which is a clear indication that your yeast is active and alive – ready to work its magic!
- 3. Combine Wet Ingredients & Initial Flour: To the activated yeast mixture, add the teaspoon of salt and the tablespoon of granulated sugar. Stir everything thoroughly until the salt and sugar are completely dissolved and well combined. Now, begin the process of incorporating the flour. Add it slowly, about 1 cup at a time, into the wet ingredients. This gradual addition is key to preventing a floury mess and allows you to precisely control the dough consistency as you mix.
- 4. Form the Dough: Continue to mix the ingredients with a sturdy wooden spoon or a robust spatula. As you progressively add more flour, you’ll notice the mixture gradually thickening. The dough will become increasingly difficult to stir, indicating it’s starting to come together into a cohesive, shaggy mass. Keep mixing until most of the flour is incorporated.
- 5. Achieve the Right Consistency for Kneading: Continue adding the remaining flour, a small amount at a time, until the dough is no longer excessively sticky to the touch. The goal is a dough that is soft, pliable, and slightly tacky, but not clinging persistently to your hands or the bowl. A reliable test for readiness is to gently poke the dough with your finger; if it springs back readily, it has enough flour and is perfectly prepared for kneading. Be cautious not to add too much flour, as this can result in dry, dense, and tough pretzels.
- 6. Knead and Portion the Dough: Turn the dough out onto a lightly floured counter surface. Knead the dough vigorously and continuously for approximately 5 minutes. Kneading is a vital step as it develops the gluten strands within the flour, which are responsible for giving the pretzels their signature chewy texture and elasticity. Once adequately kneaded, form the dough into a smooth, even ball. Using a sharp knife or a dough cutter, carefully divide the dough ball into roughly 1/3 cup sections. While precision isn’t paramount, aiming for relatively uniform pieces (typically 8-10 pretzels) will ensure consistent baking.
- 7. Shape the Ropes: Take one of the dough sections and, using the palms of your hands and a gentle, even pressure, roll it out on your lightly floured surface into a long, slender rope. The most important aspect here is to maintain a consistent diameter throughout the entire length of the rope; this ensures that your pretzels bake evenly. For medium-sized, classic pretzels, aim for ropes approximately 18-20 inches long, adjusting the length based on your desired pretzel size. Longer, thinner ropes yield more traditional, larger pretzels, while shorter, thicker ropes are perfect for creating delightful bite-sized delights.
- 8. Form the Classic Pretzel Shape: Once you’ve created a long, even rope, it’s time to master the iconic pretzel shape. Take both ends of the rope and bring them together, forming an open circle. Twist the ends around each other once or twice. Then, gracefully bring the twisted ends back towards yourself and firmly press them down onto the bottom curve of the pretzel, effectively securing the shape. This step might require a little practice, but remember, even imperfectly shaped homemade pretzels taste absolutely amazing!
- 9. Apply the Egg Wash and Salt: In a small bowl, thoroughly beat the large egg until the yolk and white are completely combined and uniform. Pour the beaten egg into a shallow dish or a pie plate for easy dipping. Carefully dunk each shaped pretzel into the egg wash, ensuring both sides are fully coated. The egg wash is crucial; it not only creates that beautiful, deep golden-brown sheen but also acts as a perfect adhesive, helping the coarse sea salt or any other desired toppings stick securely to the pretzel. Immediately after dipping, place the pretzel on your prepared baking sheet and generously sprinkle it with coarse sea salt. Repeat this process for all remaining pretzels, ensuring you arrange them with adequate space in between on the baking sheet to allow for even baking and browning.
- 10. Bake to Perfection: Carefully transfer the baking sheet filled with your beautifully shaped pretzels to your preheated 425°F (220°C) oven. Bake the pretzels for an initial 10 minutes. For the last 5 minutes of baking, turn your oven to the broil setting. This crucial step is what achieves that deeply golden, slightly crispy top crust that makes pretzels so irresistible. **Important Note:** During broiling, it is absolutely essential to watch your pretzels very closely. They can go from perfectly golden to burnt in a matter of seconds due to the intense direct heat. Stay near the oven and remove them as soon as they reach your desired level of golden brown and crispness.
- 11. Cool and Enjoy: Once baked to perfection, carefully remove the pretzels from the oven. Allow them to cool slightly on the baking sheet for just a few minutes before transferring them to a wire rack to finish cooling. These homemade soft pretzels are truly at their absolute best when enjoyed warm, fresh out of the oven, when they are at their peak softness, chewiness, and flavor.
- 12. Storage and Freezing Tips: If, by some miracle, you happen to have any leftover pretzels (which is a rare occurrence with these delicious treats!), you can store them in an airtight container or a zip-top bag at room temperature for up to 4 days. Please be aware that they will gradually lose some of their signature softness and become chewier over time. For longer-term storage, these pretzels freeze beautifully. Once they have cooled completely to room temperature, place them in a single layer on a baking sheet and flash freeze them until solid. Then, transfer the frozen pretzels to a freezer-safe bag or container for up to 2-3 months. To reheat, simply thaw them at room temperature for an hour or so, then warm gently in a preheated oven (around 350°F/175°C for 5-7 minutes) or a microwave for a few seconds to regain that wonderful fresh-baked experience.
Why These 30-Minute Pretzels Will Become Your Go-To Recipe
Beyond the sheer speed and unparalleled convenience, what truly sets this 30-minute homemade soft pretzel recipe apart is the incredible satisfaction and joy it brings. There’s a profound sense of accomplishment and culinary magic in creating something so utterly delicious from scratch, especially when it yields results that truly rival your favorite artisan bakery or bustling mall pretzel stand. With this recipe, you are in complete control of the ingredients, you can customize the toppings to your heart’s content, and, most importantly, you get to enjoy them fresh, warm, and utterly perfect, exactly when that irresistible craving strikes. This recipe isn’t just about baking; it’s about reclaiming the simple pleasure of homemade treats in our often busy and demanding world. Whether you’re a seasoned baker looking for a quick fix or a complete novice taking your first steps into the world of yeast doughs, these easy soft pretzels are designed for unequivocal success. So, next time that delicious soft pretzel craving strikes, resist the urge to reach for the frozen aisle or make a trip to the mall. Instead, gather your simple ingredients, set a timer for a mere 30 minutes, and prepare to be utterly amazed by the deliciousness and homemade comfort you can create right in your very own kitchen. It’s time to bake your way to pretzel perfection!
We’d absolutely love to hear how your homemade soft pretzels turn out! Share your favorite dipping sauces, creative topping ideas, or any personal twists you add to the recipe in the comments below. Happy baking!
Recipe source: Sallysbakingaddiction.com