
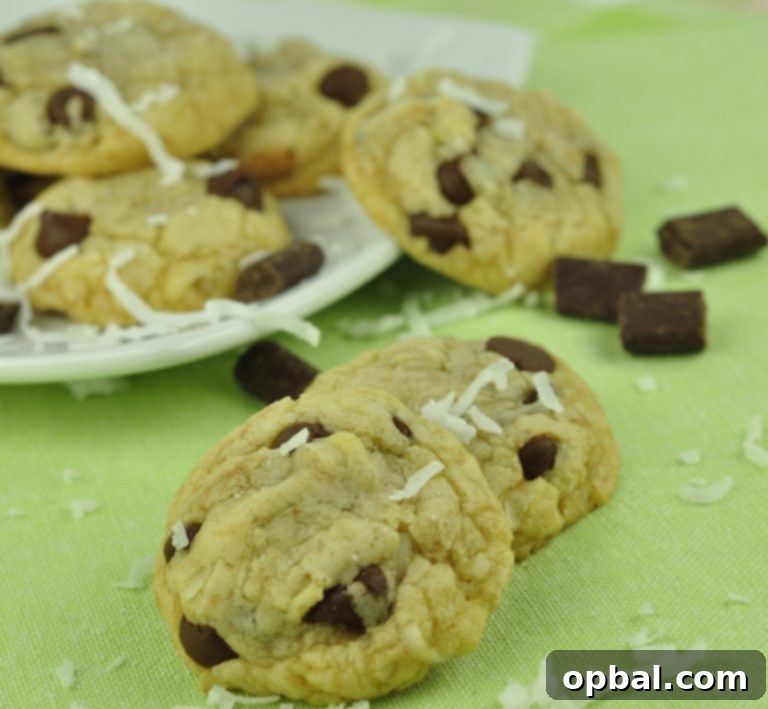
Imagine biting into a perfectly chewy, incredibly soft cookie that melts in your mouth, a delightful fusion of tropical notes and classic chocolate. Now, imagine achieving that same irresistible texture and flavor without a single gram of butter or shortening. Believe it! The secret lies in one of nature’s most versatile and beneficial ingredients: coconut oil.
For years, bakers have relied on butter for its richness and texture, but discerning palates and health-conscious home cooks are increasingly discovering the magic of coconut oil. It’s not just a substitute; it’s a transformative ingredient that brings unique qualities to your baked goods, elevating them in taste, texture, and even nutritional value. In fact, swapping out traditional fats for coconut oil in your favorite recipes, especially for cookies like these Mini Coconut Chocolate Chip delights, is surprisingly simple and yields truly spectacular results.
The Power of Coconut Oil in Baking: More Than Just a Substitute
When considering fats for baking, butter has long been the undisputed champion, celebrated for its unique flavor and ability to create tender, flaky textures. However, coconut oil presents a compelling alternative, offering both functional benefits in the kitchen and an impressive nutritional profile. While both butter and virgin coconut oil contain saturated fats, the types of fats present in coconut oil are distinctly different and offer unique advantages.
Coconut oil is exceptionally rich in Medium-Chain Triglycerides (MCTs), specifically containing about 50% lauric acid. Unlike the Long-Chain Fatty Acids (LCFAs) predominantly found in butter, MCTs are processed differently by the body. They are more readily absorbed and transported directly to the liver, where they are quickly converted into energy rather than being stored as fat. This efficient metabolic pathway is one of the key reasons why coconut oil is often touted for its potential to support energy levels and metabolic health, making it a fascinating ingredient for those looking to make more mindful food choices.
Beyond its unique nutritional makeup, coconut oil boasts several practical advantages for the home baker. It exhibits a higher smoke point compared to butter, meaning it can withstand greater heat without breaking down or developing undesirable flavors. This stability also contributes to a longer shelf life for both the oil itself and the baked goods it’s incorporated into. Cookies and other treats made with coconut oil often stay fresh and palatable for extended periods, resisting staleness more effectively than those made with butter – a definite perk for meal prepping or sharing homemade goodies.
Furthermore, coconut oil naturally imparts a subtle, pleasing aroma and a hint of tropical flavor that can beautifully complement a wide array of sweet recipes. While some might initially be hesitant about a “coconut-y” taste, it’s a flavor that can be embraced and appreciated, particularly in desserts featuring ingredients like chocolate chips, oats, or other fruits. For recipes where a neutral fat is preferred, refined coconut oil can be used, as the refining process removes most of the distinct coconut flavor and aroma, though virgin coconut oil is often preferred for its unadulterated benefits and taste.
Mastering the Coconut Oil Swap: Simple Tips for Baking Success
Switching from butter to coconut oil in your baking endeavors is surprisingly straightforward, but a few key tips can ensure seamless success. The primary consideration is the state of the coconut oil at the time of use, as it behaves differently depending on whether it’s solid or liquid. Coconut oil has a melting point around 76°F (24°C), meaning it can be solid at room temperature in cooler environments and liquid in warmer ones.
When a recipe calls for melted butter, the substitution is a direct 1:1 ratio. Simply melt your coconut oil and use it in the liquid state. It’s crucial, however, to let the melted coconut oil cool slightly before incorporating it into other ingredients, especially eggs, to prevent it from scrambling them. A good rule of thumb is to let it cool until it’s warm to the touch but not hot. Conversely, if your recipe requires solid butter, you’ll need to chill your coconut oil. Spoon the liquid oil into a bowl, then place it in the refrigerator until it solidifies. Once firm, you can measure it out and use it just as you would solid butter.
Accuracy in measurement is paramount regardless of its state. Always measure the coconut oil in the form the recipe dictates – if it calls for “3/4 cup solid, melted,” measure it solid first, then melt it, and re-measure if needed to ensure consistency. This precision helps maintain the delicate balance of fats and liquids that is essential for ideal cookie texture.
Another important factor to remember is the inherent “coconut-y” taste of virgin coconut oil. While this flavor is absolutely delightful and enhances recipes like the one below, it’s not always desired. If you’re baking something where a tropical note would clash, or if you prefer a neutral profile, opt for refined coconut oil, which has a much milder, almost undetectable flavor. However, for these Mini Coconut Chocolate Chip Cookies, the virgin coconut oil’s natural essence is not just appreciated, it’s absolutely celebrated, adding an extra layer of deliciousness that makes these treats truly special.
The Irresistible Charm of Mini Cookies
There’s something inherently delightful about miniature versions of anything, isn’t there? From tiny teacups to adorable puppies, things in miniature form possess an undeniable cuteness that’s hard to resist. The same holds true for cookies. These Mini Coconut Chocolate Chip Cookies are no exception to the rule; their small size makes them incredibly charming and even more appealing.
But beyond their aesthetic appeal, mini cookies offer practical advantages. They are perfect for portion control, allowing you to enjoy the indulgence of a cookie (or five!) without feeling overwhelmed. This “guilt-free” approach to snacking makes them ideal for everyday treats or for satisfying that sweet craving without overdoing it. Their petite size also makes them excellent for sharing, perfect for bake sales, party platters, or simply as a thoughtful gift. Each bite delivers a concentrated burst of flavor and texture, making every cookie a memorable experience.
Recipe: Irresistible Mini Coconut Chocolate Chip Cookies
This recipe truly highlights the wonderful qualities of coconut oil, producing cookies that are perfectly chewy, incredibly soft, and bursting with tropical flavor. The combination of rich brown sugar, fragrant coconut oil, and delectable chocolate chips creates a symphony of tastes and textures that will have everyone asking for more. Get ready to bake a batch of these charming little treats that are sure to become a new favorite!
INGREDIENTS:
3/4 cup virgin coconut oil (measured solid), then melted and slightly cooled (approximately 170g)
1 cup loosely packed brown sugar (approximately 200g)
1/3 cup granulated sugar (approximately 65g)
1 large egg + 1 large egg yolk (at room temperature for best results)
2 teaspoons pure vanilla extract
1/4 teaspoon coconut extract* (optional, but highly recommended for an intensified coconut flavor)
2 cups all-purpose flour (approximately 240g), spooned and leveled
1/2 teaspoon baking soda
1/4 teaspoon fine sea salt
2/3 cup shredded unsweetened coconut (approximately 60g)
2/3 cup mini chocolate chips (approximately 115g)
DIRECTIONS:
1. Prepare Your Oven and Baking Sheets: Begin by preheating your oven to 325 degrees F (160 degrees C). Line several baking sheets with parchment paper or silicone baking mats to ensure the cookies don’t stick and bake evenly. Having your sheets ready will make the baking process much smoother.
2. Combine Fats and Sugars: In a large mixing bowl, combine the melted coconut oil with the loosely packed brown sugar and granulated sugar. Whisk these ingredients together until they are well combined and appear smooth. Allow this mixture to sit for about 15 minutes. This resting period is important as it allows the sugars to fully dissolve into the coconut oil, contributing to a chewier cookie texture.
3. Add Wet Ingredients: After the resting period, whisk in the large egg, the additional large egg yolk, and both the vanilla extract and optional coconut extract. Continue whisking vigorously until the mixture is completely smooth and uniform. Ensure any remaining chunks of brown sugar are fully broken up and incorporated – continuous stirring will help achieve this perfectly smooth consistency.
4. Incorporate Dry Ingredients (Part 1): Add 1/2 cup of the all-purpose flour to the wet mixture, along with the baking soda and salt. Stir gently with a spoon or spatula until these dry ingredients are just combined. Be careful not to overmix at this stage; overmixing can lead to tougher cookies.
5. Incorporate Dry Ingredients (Part 2): Gradually add the remaining flour, 1/2 cup at a time, stirring after each addition until the flour is just incorporated and no dry streaks remain. This gradual addition helps prevent overmixing and ensures the dough comes together smoothly.
6. Fold in Mix-ins: Finally, gently fold in the shredded coconut and mini chocolate chips. Use a spatula to carefully incorporate them into the dough until they are evenly distributed throughout. Avoid aggressive mixing to maintain the integrity of the chocolate chips and prevent toughening the dough.
7. Form the Cookies: Take about 1 to 1 1/2 tablespoons of dough for each cookie. Roll the dough into small, uniform balls with your hands and place them onto your prepared nonstick baking sheets. Make sure to space the dough balls about 1-2 inches apart to allow for proper spreading during baking.
8. Bake to Perfection: Transfer the baking sheets to the preheated oven and bake for 7-8 minutes. The cookies are ready when the edges are just set and very lightly golden, but the centers still look slightly soft. Remember, these are mini cookies, so they bake quickly! Avoiding overbaking is key to achieving that wonderfully soft and chewy texture.
9. Cool Completely: Once baked, remove the cookies from the oven and let them cool completely on the baking sheets. They will continue to set as they cool, firming up to the perfect chewy consistency. Resist the urge to move them too soon, as they will be delicate when warm.
*A note on the coconut extract: You can certainly omit the coconut extract if you prefer a more subtle coconut flavor or don’t have it on hand. It won’t drastically change the overall taste, but it does enhance the coconut notes beautifully. Also, feel free to make these as normal-sized cookies if you wish; simply adjust baking time accordingly (usually a few minutes longer for larger cookies).
Frequently Asked Questions About Baking with Coconut Oil
As more bakers explore the versatility of coconut oil, a few common questions tend to arise. Here are some answers to help you confidently incorporate this amazing ingredient into your baking repertoire:
Q: Can I use refined coconut oil instead of virgin coconut oil?
A: Absolutely! If you prefer a neutral taste and do not want any coconut flavor in your baked goods, refined coconut oil is an excellent choice. The refining process removes most of the characteristic coconut aroma and taste, making it ideal for recipes where you want the fat to be imperceptible in flavor. For these Mini Coconut Chocolate Chip Cookies, however, virgin coconut oil’s natural flavor beautifully complements the other ingredients.
Q: My dough seems a bit different with coconut oil. Is this normal?
A: Yes, it can be. Coconut oil reacts slightly differently with other ingredients compared to butter. Depending on the ambient temperature, your dough might feel a little softer or firmer. If your dough feels too sticky or soft to handle, try chilling it in the refrigerator for 15-30 minutes. This will help the coconut oil solidify slightly, making the dough easier to roll and shape.
Q: How should I store these coconut oil cookies?
A: These cookies, like most, are best stored in an airtight container at room temperature. Thanks to the inherent stability of coconut oil, they tend to stay fresh and chewy for several days, often longer than butter-based cookies. For extended freshness, you can also freeze the baked cookies in a freezer-safe container for up to 2-3 months. Thaw them at room temperature when you’re ready to enjoy.
Q: Can I freeze the cookie dough?
A: Yes, you can! This is a fantastic way to have fresh cookies on demand. Roll the dough into balls as directed, then place them on a parchment-lined baking sheet and freeze until solid. Once frozen, transfer the dough balls to a freezer-safe bag or container and store for up to 3 months. When ready to bake, place the frozen dough balls on a baking sheet (no need to thaw) and add a few extra minutes to the baking time.
Q: What are some other recipes where coconut oil works well?
A: Coconut oil is incredibly versatile! It works beautifully in brownies, muffins, quick breads, and even pie crusts where you’re looking for a flaky texture without butter. It’s particularly well-suited for vegan baking, as it provides a solid, creamy fat source that mimics butter’s characteristics.
Conclusion: Embrace the Coconut Oil Revolution
These Mini Coconut Chocolate Chip Cookies are more than just a sweet treat; they’re a testament to the incredible versatility and benefits of baking with coconut oil. They prove that you don’t need butter or shortening to achieve cookies that are perfectly chewy, incredibly soft, and utterly delicious. With their delightful tropical undertones and the classic comfort of chocolate chips, these mini wonders are perfect for any occasion – from a quick, guilt-free snack to a charming addition to your dessert spread.
So, whether you’re a seasoned baker looking for healthier alternatives, or simply curious to explore new flavors and ingredients, we wholeheartedly encourage you to try this recipe. Embrace the power of coconut oil and discover a world of baking possibilities that are both delicious and wonderfully unique. Happy baking!
Recipe source: howsweeteats.com