
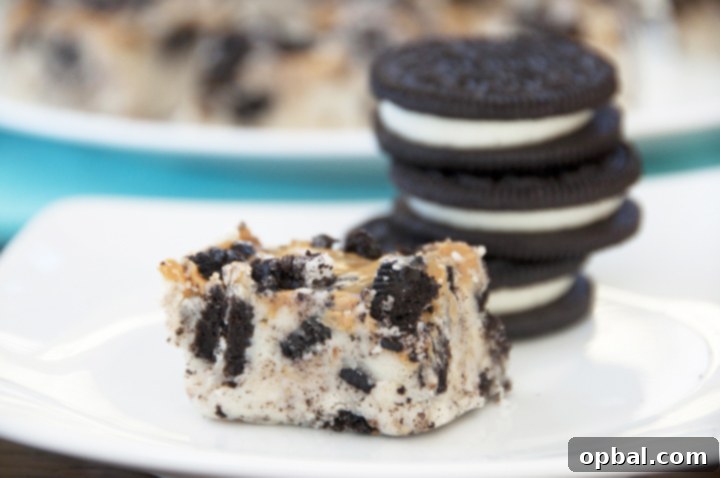
Prepare to indulge in the most decadent, creamy, and ridiculously easy dessert you’ve ever made! This Peanut Butter and White Chocolate Fudge, generously studded with crushed Oreo cookies, is an absolute game-changer. It’s a no-bake marvel, perfect for holiday gatherings, impromptu treats, or stealing a quiet moment of bliss. Get ready to impress everyone at your next cookie swap!
The Ultimate No-Bake Oreo Peanut Butter White Chocolate Fudge
There are some flavor combinations that just speak to the soul, and for me, this Oreo Peanut Butter Swirl White Chocolate Fudge recipe hits every nostalgic note. It’s more than just a dessert; it’s a sweet symphony that brings together three of my all-time favorite ingredients into one perfect, dreamy confection. If you grew up loving the simple joys of a classic cookie, the creamy richness of peanut butter, and the unique sweetness of white chocolate, then prepare for this recipe to become an instant favorite in your kitchen.
A Trio of Childhood Favorites: Why This Fudge is Pure Perfection
This fudge isn’t just a recipe; it’s a celebration of pure, unadulterated comfort food that promises to transport you back to simpler times with every delightful bite. Let’s break down why this specific combination creates such an extraordinary treat:
1. The Irresistible Charm of Oreos
Is there anyone who doesn’t adore Oreos? From twisting them apart to dunking them in milk, these iconic chocolate sandwich cookies are a staple of childhood and beyond. They embody a playful nostalgia that few other treats can rival. In this no-bake fudge, crushed Oreos provide a delightful textural contrast, adding that signature chocolatey crunch that perfectly cuts through the smooth, creamy richness of the fudge. They’re not just a topping; they’re an integral part of the flavor profile, infusing depth and a playful element that makes every bite exciting. I confess, I could (and still can!) never get enough of them. The slight bitterness of the cookie mixed with the sweet cream filling creates a flavor bomb when paired with the other ingredients, ensuring this fudge is anything but one-dimensional.
2. The Undeniable Allure of Peanut Butter
Ah, peanut butter. My culinary muse! If you’ve explored my other recipes, you’ll know my adoration for peanut butter runs deep. It’s not just a spread; it’s a versatile ingredient that adds richness, nutty depth, and a comforting familiarity to countless dishes. Its distinctive, savory-sweet flavor pairs so perfectly with chocolate – especially white chocolate, creating a balance that’s simply divine. In this creamy fudge, the peanut butter swirl isn’t merely decorative; it permeates the entire dessert with that robust flavor we all know and love. Its smooth, creamy texture also contributes significantly to the luxurious mouthfeel of the fudge, making each piece melt-in-your-mouth delicious. It’s the kind of ingredient that truly elevates a dessert from good to unforgettable, adding a layer of wholesome comfort that’s hard to beat.
3. The Sweet Embrace of White Chocolate
Now, this might be where I stand out from the crowd, but I’ll proudly declare my undying preference for white chocolate over any other chocolate on the planet. Call me unconventional, but its unique, creamy, vanilla-infused sweetness has always captivated me. While growing up, I was the odd one out at Easter, insisting the Bunny fill my basket exclusively with white chocolate treats. (And yes, he always obliged, alongside a generous helping of jelly beans!) It wasn’t until my early twenties that I even began to tolerate some dark chocolate desserts, and even then, my heart still yearns for white chocolate or bright, fruity candies like Skittles and sour gummy worms. In this fudge, white chocolate forms the luxurious base, providing a sweet canvas that beautifully complements the robust flavors of peanut butter and Oreos without overpowering them. It brings a silky smooth texture and a sweet, almost milky undertone that distinguishes this fudge from its milk or dark chocolate counterparts, making it truly special and deserving of its place in this iconic trio.
So, whether you’re a fellow white chocolate enthusiast or a traditionalist who usually opts for milk or dark, trust me when I say this white chocolate fudge will win you over. The rave reviews from everyone who’s tried it are proof positive. I even received a good-natured scolding from my husband for finishing the last square – which, naturally, I took as the highest compliment to my dessert-making prowess!
Why Choose a No-Bake Fudge? The Ultimate Convenience
One of the most appealing aspects of this fudge recipe is its “no-bake” nature. This means no oven time, no complicated tempering, and significantly less fuss. For busy holidays, festive cookie swaps, or just when you’re craving something sweet without the commitment of traditional baking, no-bake recipes are a godsend. They free up your oven for other dishes, reduce stress in the kitchen, and allow you more time to enjoy the festive season or simply relax. This recipe proves that you don’t need to spend hours meticulously baking to create a truly spectacular, impressive, and incredibly delicious dessert that everyone will adore.
Essential Tips for Fudge Perfection
While this recipe is wonderfully straightforward, a few key tips will ensure your peanut butter white chocolate fudge turns out perfectly creamy and delicious every single time:
- Use Quality Ingredients: Because the ingredient list is relatively short, the quality of your white chocolate chips (or chopped bar) and peanut butter will significantly impact the final taste and texture. Opt for good quality brands you love and trust.
- Patience is Key for Setting: Please note: The absolute hardest part of this entire process is patiently waiting the full 8 hours (or preferably overnight) for the fudge to properly set! Planning ahead is crucial. Resist the urge to cut into it too soon, as it needs that dedicated time to firm up to the perfect, sliceable consistency.
- Line Your Pan Properly: Always line your baking pan with parchment paper or foil, ensuring you leave a generous overhang on the sides. This simple step makes lifting the entire slab of set fudge out of the pan incredibly easy for clean, effortless cutting.
- Crushing Oreos: For the best results, crush your Oreo cookies finely for mixing into the fudge, ensuring they integrate smoothly. For topping, you can crush them slightly coarser to add visual appeal and an extra satisfying crunch. A food processor works wonders here, or a Ziploc bag and a rolling pin for a therapeutic stress reliever!
- Mastering the Swirl: For a stunning peanut butter swirl, spoon dollops of warmed, extra creamy peanut butter over the white chocolate mixture once it’s in the pan. Then, use a skewer or a butter knife to gently swirl them together. The trick is to swirl just enough to create a marbled effect without fully incorporating the peanut butter, which would diminish the beautiful contrast.
- Proper Storage: Store your delectable Oreo Peanut Butter White Chocolate Fudge in an airtight container at room temperature for up to a week for optimal freshness. Alternatively, it can be refrigerated for longer preservation, up to two weeks. This fudge also freezes beautifully for up to a month, making it perfect for meal prep or future cravings!
Looking for more nostalgic treats? If you missed them, earlier this week I shared other childhood favorites like these Frosted Animal Sugar Cookies and a comforting recipe for Homemade SpaghettiOs! Exploring these classic flavors brings so much joy, and this fudge truly takes the crown for sweet indulgence and ease of preparation.
Oreo Peanut Butter Swirl White Chocolate Fudge
An incredibly easy, no-bake recipe for creamy fudge featuring a delightful blend of white chocolate, rich peanut butter, and crunchy Oreo cookies. Perfect for gifting, parties, holiday cookie swaps, or simply satisfying your sweet tooth!
Prep Time:
15 minutes
Chill Time:
8 hours (or preferably overnight)
Yields:
Approx. 24-36 squares (depending on desired size)
Ingredients:
- 1 (14 ounce / 397g) can sweetened condensed milk
- 3 cups (about 18 ounces / 510g) good quality white chocolate chips or finely chopped white chocolate bar
- ½ cup (120g) creamy peanut butter (such as Jif or Skippy – avoid natural, oily varieties for best results)
- 1 teaspoon pure vanilla extract
- ¼ teaspoon salt (to enhance flavors and balance sweetness)
- 12-15 regular Oreo cookies, crushed (yields about 1.5 cups crushed)
- ¼ cup (60g) extra creamy peanut butter, slightly warmed (for swirling, optional but highly recommended for visual appeal and added flavor)
- Extra crushed Oreos for topping (optional, for garnish and added crunch)
Equipment:
- 8×8 or 9×9 inch square baking pan
- Parchment paper or aluminum foil
- Medium heavy-bottomed saucepan (or a double boiler setup)
- Heat-safe mixing bowl (if using double boiler method)
- Rubber spatula or wooden spoon
- Skewer, butter knife, or toothpick for creating the swirl
- Sharp knife for cutting
Instructions:
- Prepare Your Pan: Begin by lining an 8×8 or 9×9 inch square baking pan with parchment paper or aluminum foil. Ensure the paper/foil hangs over the edges of the pan; this “sling” will make it incredibly easy to lift the set fudge out later.
- Melt White Chocolate Mixture: In a medium heavy-bottomed saucepan, combine the entire can of sweetened condensed milk with the white chocolate chips. Heat this mixture over very low heat, stirring continuously with a rubber spatula or wooden spoon. Continue stirring until the white chocolate is completely melted and the mixture is smooth, creamy, and thoroughly combined. Be careful not to overheat. Alternatively, you can use a double boiler method for more gentle melting: place the ingredients in a heat-safe bowl set over a pot of simmering water, ensuring the bottom of the bowl does not touch the water.
- Stir in Flavors: Once the white chocolate is melted and smooth, remove the saucepan from the heat. Stir in the ½ cup of creamy peanut butter, vanilla extract, and salt. Mix thoroughly until all ingredients are fully incorporated and the fudge mixture is uniformly smooth and fragrant. The salt plays an important role in cutting through the sweetness and balancing the rich flavors.
- Add Oreos: Gently fold in about 1 cup of the crushed Oreo cookies into the fudge mixture. Stir just until the Oreos are evenly distributed throughout. Avoid overmixing, as you want to maintain some texture from the cookie pieces.
- Pour into Pan: Carefully pour the warm fudge mixture evenly into the prepared baking pan. Use your rubber spatula to spread it out smoothly into an even layer, ensuring it reaches all corners of the pan.
- Create Peanut Butter Swirl (Optional but Recommended): If you’re opting for the beautiful peanut butter swirl, warm the additional ¼ cup of creamy peanut butter in the microwave for about 15-20 seconds until it’s slightly thinner and easily dollop-able. Drop small spoonfuls or streaks of this warmed peanut butter over the top of the fudge mixture in the pan. Then, take a skewer, a butter knife, or a toothpick and gently drag it through the peanut butter and white chocolate fudge to create attractive swirls. Remember not to overmix, as the goal is distinct marbled patterns.
- Top with Oreos: Generously sprinkle the remaining ½ cup of crushed Oreos evenly over the top surface of the fudge. Gently press the Oreo crumbs lightly into the fudge with your spatula or fingertips to ensure they adhere and create a beautiful, crunchy topping.
- Chill and Set: Cover the pan loosely with plastic wrap. Transfer the pan to the refrigerator and chill for at least 8 hours, or preferably overnight, until the fudge is completely set and very firm. This extended chilling time is crucial for achieving the perfect sliceable texture.
- Cut and Serve: Once the fudge is thoroughly set, use the parchment paper or foil overhang to carefully lift the entire slab of fudge out of the pan and place it onto a clean cutting board. Using a sharp knife, cut the fudge into desired small squares (typically 1 to 1.5 inches). For extra clean cuts, you can slightly warm your knife under hot water and wipe it clean between each cut.
- Enjoy and Store: Serve your delicious Oreo Peanut Butter Swirl White Chocolate Fudge chilled or at room temperature. Store any leftover fudge in an airtight container. It will remain fresh and delightful at room temperature for up to 1 week, or in the refrigerator for up to 2 weeks. This fudge also freezes exceptionally well for up to 1 month; just thaw it in the refrigerator or at room temperature before serving.
Notes and Variations:
- Peanut Butter Consistency: For the best and most consistent results, always use creamy, shelf-stable peanut butter (like Jif, Skippy, Peter Pan). Natural peanut butter, which tends to separate and be oilier, may result in a greasier or less stable fudge.
- White Chocolate Quality: The quality of your white chocolate truly matters here. Opt for baking-grade white chocolate chips or a high-quality white chocolate bar. Avoid “white candy melts” or “white confectionery coating” as they often contain less cocoa butter and can result in a waxy texture.
- Add Nuts: For an extra layer of crunch and nutty flavor, consider folding in ½ cup of chopped roasted peanuts or pecans along with the crushed Oreos.
- Experiment with Cookies: While Oreos are a classic and delicious choice, feel free to get creative! You could try other crushed cookies like chocolate chip cookies, graham crackers, Biscoff cookies, or even shortbread for different flavor profiles.
- Gifting Idea: This homemade fudge makes a truly thoughtful and impressive gift! Cut into neat squares, arrange them beautifully in decorative boxes or tins, and share the sweetness with your friends, family, and neighbors during the holidays or any special occasion.