
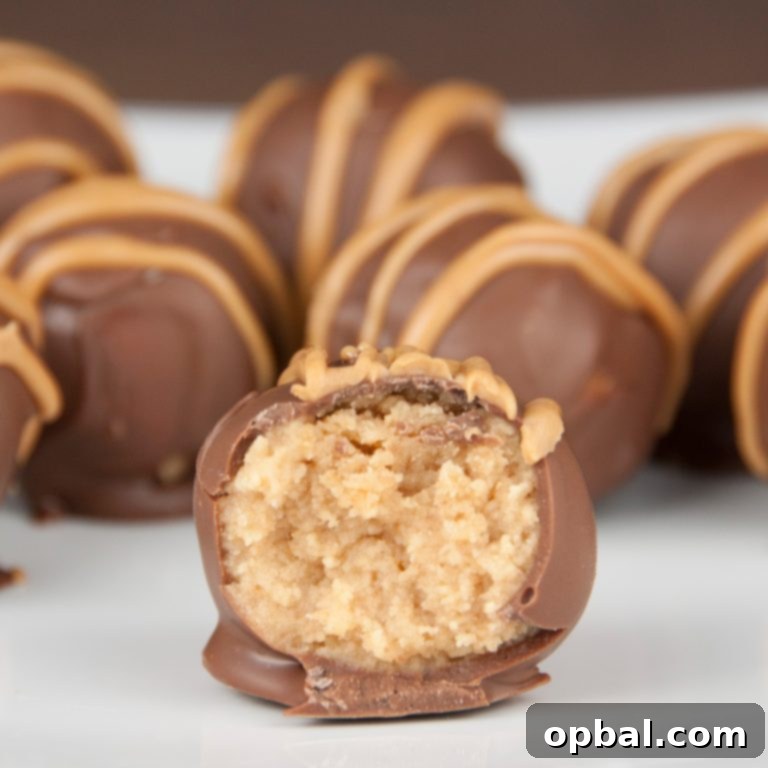
Indulge in Sweet Nostalgia: The Ultimate Nutter Butter Truffles Recipe (aka Peanut Butter Cookie Balls)
Do you ever find yourself transported back to simpler times with just one bite of a particular food? There’s a profound joy in revisiting the flavors of childhood, a culinary journey that often brings comfort and a smile. Recently, I’ve been on such a nostalgic trip, revisiting cherished recipes that evoke fond memories. From Fudge Stripe Cookie Cupcakes to classic Homemade Chicken Noodle Soup, and even a gourmet take on Margherita Macaroni and Cheese, my kitchen has been a hub of childhood favorites. And now, joining this delightful collection, are these incredible Nutter Butter Truffles – a dessert that captures the essence of pure peanut butter bliss, coated in rich chocolate, and finished with a delicate drizzle.
The Irresistible Allure of Nutter Butter Cookies
For those unfamiliar with the legendary Nutter Butter, prepare to meet your new favorite cookie. Crafted by Nabisco, these aren’t just any peanut butter cookies; they are an experience. Each Nutter Butter is a perfect sandwich cookie, featuring two crispy, peanut-shaped shortbread cookies generously filled with a creamy, authentic peanut butter spread. The balance of salty and sweet, crunchy and smooth, makes them a culinary masterpiece in a glorious, store-bought package. If you haven’t yet had the pleasure of tasting one, I urge you to try them – they are, in my humble opinion, pure perfection.
The distinct flavor and texture of Nutter Butters make them an exceptional base for a variety of desserts. After experimenting with other beloved childhood treats like Circus Animal cookies, I was inspired to create something equally creative and fun with Nutter Butters. The result? These unbelievably delicious Nutter Butter Truffles, often affectionately referred to as “cookie balls.” When these delightful peanut butter cookies are enveloped in a luxurious chocolate coating, their flavor transforms, reminiscent of classic Buckeyes, but with that unmistakable Nutter Butter crunch and creaminess. They are truly a treat you won’t want to miss.
Crafting Your Own Nutter Butter Truffles: A Simple Indulgence
These Nutter Butter Truffles are a testament to the fact that some of the most impressive desserts can also be the easiest to make. Requiring no baking and just a few simple ingredients, these cookie balls are perfect for any occasion – from holiday gatherings to casual get-togethers, or simply when a craving for a rich, peanut butter and chocolate treat strikes. The combination of crushed Nutter Butters and softened cream cheese creates a delectable, dough-like base that’s easy to work with and incredibly flavorful.
Nutter Butter Truffles
These delightful Nutter Butter cookie truffles, also known as peanut butter cookie balls, are a no-bake dessert masterpiece. Each ball features a rich, creamy Nutter Butter and cream cheese base, expertly covered in smooth milk chocolate, and elegantly finished with a drizzle of melted peanut butter. Perfect for parties, holidays, or a special treat, they are sure to be a crowd-pleaser.
Recipe Type: Dessert
Prep time:
Total time:
Yields: Approximately 32 truffles
Ingredients for Peanut Butter Perfection
- 1 standard package (approximately 16 oz or 450g) Nutter Butter cookies
- 1 package (8 oz or 226g) cream cheese, softened to room temperature
- 2-3 cups good quality milk chocolate melting discs or chocolate chips (for coating)
- Approximately 1/4 cup creamy peanut butter (for drizzling)
Step-by-Step Guide to Irresistible Truffles
- Prepare the Cookie Base: Begin by crushing the entire package of Nutter Butter cookies. The most efficient way to do this is using a food processor. Pulse the cookies until they form fine crumbs, resembling coarse sand. If you don’t have a food processor, you can place the cookies in a large, sturdy zip-top bag and crush them with a rolling pin or the back of a heavy pan until finely ground.
- Incorporate the Cream Cheese: Cut the softened cream cheese into several chunks. Add these chunks directly into the food processor with the crushed Nutter Butters. If you’re mixing by hand, add the cream cheese to a large bowl with the crumbs.
- Form the Dough: Pulse the mixture in the food processor until it combines into a cohesive, dough-like consistency. It should be thick and pliable enough to roll into balls. If mixing by hand, use a sturdy spoon or your hands to thoroughly combine the ingredients until a dough forms.
- Roll into Balls: Take small portions of the dough, about 1 inch in diameter, and roll them gently between your palms to form smooth, uniform balls. The size can vary based on your preference, but consistency helps with even coating.
- Chill the Truffles: Arrange the rolled Nutter Butter balls on a parchment-lined cookie sheet. Place the sheet in the freezer for at least 10-15 minutes. This chilling step is crucial as it helps the balls firm up, making them easier to dip and ensuring the chocolate coating sets smoothly without cracking.
- Melt the Chocolate: While the truffles are chilling, prepare your chocolate coating. Place the milk chocolate discs or chips in a microwave-safe bowl. Melt the chocolate in the microwave on a low (50%) power setting to prevent scorching or burning. Heat in short intervals (30-60 seconds), stirring thoroughly between each burst of heat, until the chocolate is smooth and completely melted. Alternatively, you can use a double boiler method for a more controlled melt, gently heating the chocolate over simmering water.
- Coat the Truffles: Once the truffles are firm and the chocolate is melted and smooth, it’s time to dip. Using a toothpick or a small fork, gently dip each Nutter Butter ball into the melted chocolate, ensuring it’s fully coated. Lift the truffle, allowing any excess chocolate to drip back into the bowl. This helps create a thin, even coating. You may need to melt more chocolate as you go, especially if it cools and thickens.
- Set the Chocolate: Carefully place the chocolate-covered truffles back onto the waxed or parchment paper-lined cookie sheet. Allow them to cool and set completely. You can place them in the refrigerator for quicker setting.
- Add the Peanut Butter Drizzle: For an extra touch of flavor and visual appeal, melt a small amount of creamy peanut butter (about 1/4 cup should suffice) in the microwave for 15-30 seconds until it’s pourable. Use a spoon or a fork to artfully drizzle the melted peanut butter over the set chocolate truffles.
- Final Chill and Serve: Store the finished Nutter Butter Truffles in the refrigerator for at least 1 hour, or until they are firm. Keep them refrigerated until ready to serve to maintain their perfect texture.
Expert Tips for Flawless Nutter Butter Truffles:
- Dough Consistency: If your Nutter Butter and cream cheese mixture feels too sticky to roll, refrigerate it for 15-30 minutes to firm it up slightly before rolling.
- Even Coating: To easily coat balls with melted chocolate in batches, you can add several chilled balls to a bowl of melted chocolate. Use two forks to gently roll the balls until evenly coated. Remove them with the forks, allowing excess chocolate to drip back into the bowl before transferring them to the parchment paper.
- Chocolate Quality: Using good quality melting chocolate or tempering your chocolate can result in a glossier, snappier coating. Candy melts are also an excellent, easy-to-use option.
- Garnish Galore: Beyond the peanut butter drizzle, consider adding a sprinkle of sea salt for a sophisticated touch, or colorful sprinkles for a festive look while the chocolate is still wet.
Creative Variations and Serving Suggestions
While these Nutter Butter Truffles are undeniably perfect as is, there’s always room for a little creativity! Consider experimenting with different types of chocolate for the coating. Dark chocolate offers a delightful counterpoint to the sweetness of the Nutter Butters, while white chocolate can add a creamy, milder flavor. For an extra layer of texture and visual appeal, try sprinkling them with finely chopped peanuts, mini chocolate chips, or festive sprinkles immediately after dipping, before the chocolate sets.
These truffles are ideal for gifting during holidays or special occasions. Arrange them elegantly in a decorative box, and they make a thoughtful, homemade present that anyone with a sweet tooth will adore. They also shine as part of a dessert platter, offering a unique no-bake option alongside cakes and cookies. Their rich flavor and appealing appearance make them a standout treat at any party or family gathering.
Storage and Longevity
To maintain their optimal freshness and texture, Nutter Butter Truffles should always be stored in an airtight container in the refrigerator. When properly stored, they will remain delicious for up to one week. The chill helps keep the cream cheese base firm and prevents the chocolate from becoming too soft. For longer storage, these truffles can also be frozen for up to a month. Simply transfer them to an airtight, freezer-safe container. When you’re ready to enjoy them, thaw them in the refrigerator for a few hours before serving. This makes them an excellent make-ahead dessert for busy times.
The Joy of Homemade Treats: A Sweet Conclusion
There’s an unparalleled satisfaction that comes from creating delicious treats in your own kitchen, especially when they bring back such wonderful memories. These Nutter Butter Truffles embody that spirit perfectly – they are simple to make, incredibly rewarding, and an absolute delight to share. Whether you’re making them for a special event or just to satisfy a sweet craving, they are guaranteed to bring a smile to your face and those around you. So, gather your ingredients, embrace the nostalgia, and prepare to indulge in these wonderfully easy and utterly delicious Nutter Butter cookie balls. Enjoy every peanut-buttery, chocolate-covered bite!