
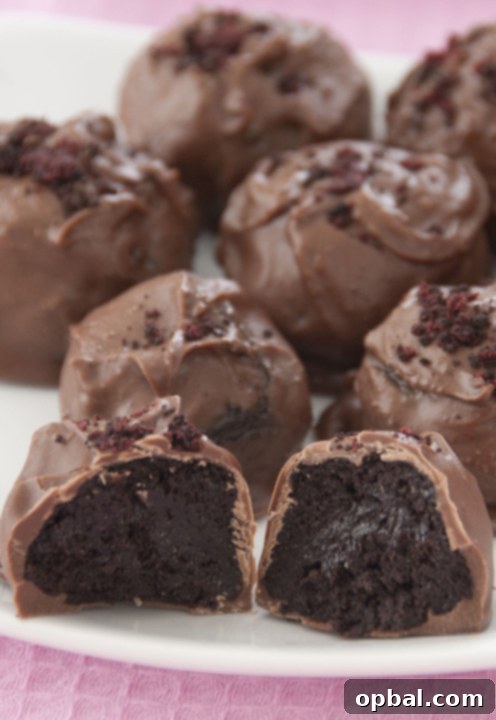
Irresistible 3-Ingredient Holiday Oreo Truffles: Your New Favorite Christmas Dessert
The holiday season is a magical time, filled with warmth, cheer, and, of course, an abundance of delicious treats. Among the myriad of festive sweets, there’s one particular dessert that stands out for its simplicity, decadent flavor, and undeniable holiday charm: the Holiday Oreo Truffle. Imagine perfectly crushed holiday Oreo cookies, lovingly blended with smooth cream cheese, then enrobed in a rich layer of melted milk chocolate. This isn’t just a dessert; it’s a dream come true for anyone seeking an easy yet incredibly impressive Christmas goodie. And the best part? It only requires three humble ingredients!
As Christmas rapidly approaches, the hustle and bustle can sometimes overwhelm even the most organized among us. Whether you’re a meticulous planner or a last-minute enthusiast, finding time for elaborate baking can be a challenge. That’s where these spectacular truffles shine. They embody everything we adore about holiday treats – festive appeal, rich flavor, and effortless preparation. Forget complicated recipes with endless ingredient lists; these Oreo truffles are proof that sometimes, the simplest creations are truly the most satisfying and beloved.
Why These Holiday Oreo Truffles Are a Must-Make
Over the years, I’ve dabbled in many variations of Oreo truffles, experimenting with different flavors, coatings, and embellishments. While those “fancy versions” certainly have their place, there’s an unparalleled joy in the classic, unadorned Oreo ball, especially when infused with the festive spirit of holiday Oreos. If I were forced to choose just one Christmas dessert to enjoy for the rest of my life, it would undoubtedly be these easy-to-make, utterly delightful holiday Oreo truffles. Their simplicity belies their incredible taste, reminding us that culinary excellence doesn’t always require complexity.
These truffles are more than just a treat; they’re an experience. The crunch of the finely ground cookies, the creamy tang of the cream cheese, and the sweet embrace of the milk chocolate create a symphony of textures and flavors. They are perfect for holiday parties, cookie exchanges, edible gifts for neighbors and friends, or simply as a well-deserved indulgence after a long day of holiday preparations. Their no-bake nature means no oven space required, which is a huge bonus during a season when the oven is often in high demand for roasts and casseroles.
The Secret to Effortless Truffle Making: A Powerful Food Processor
While these truffles are undeniably simple, there’s one kitchen tool that transforms the process from easy to utterly effortless: a high-quality food processor. Honestly, I can’t imagine my kitchen life without one. Food processors are true game-changers, dramatically cutting down prep time and making tasks that once felt arduous incredibly quick and simple. During the hectic holiday season, saving time is paramount, allowing us to spend more moments enjoying the festivities rather than slaving away in the kitchen.
Recently, I had the pleasure of incorporating the Hamilton Beach Stack & Snap™ 10 Cup Food Processor into my holiday cooking and baking routine, and it has quickly become an indispensable ally. This highly-rated and affordable kitchen workhorse streamlines so many tasks, from chopping vegetables for festive meals to, of course, making these amazing Oreo truffles. Its intuitive design and robust performance make it a standout choice for home cooks looking to enhance their culinary efficiency.
Making these holiday Oreo truffles with the Hamilton Beach Stack & Snap was an absolute breeze. I was particularly impressed by its user-friendly interface. The simple function guide clearly indicates which blade to use and which button to press for various tasks, eliminating any guesswork. This “fail-proof” assembly means you spend less time fumbling with parts and more time creating culinary magic. Its powerful 450-watt motor effortlessly slices, shreds, mixes, chops, and purees whatever your recipe demands in mere moments. I put it to the ultimate test by adding an entire package of Oreos at once, rather than in batches, and it handled the job with impressive speed and precision, transforming them into perfectly fine crumbs.
Discovering the Hamilton Beach Stack & Snap 10 Cup Food Processor
The Hamilton Beach Stack & Snap Food Processor addresses a common frustration many home cooks face: the difficulty of assembling a food processor correctly. Its unique, patent-pending design eliminates the need for complicated twisting and locking mechanisms, making setup quick and intuitive. The wide Big Mouth® feed tube is another fantastic feature, significantly reducing the amount of pre-cutting required for larger ingredients. This means less time spent on tedious chopping and more time on the fun parts of cooking. Furthermore, the sealed bowl design is a thoughtful touch, preventing messy leaks and ensuring a cleaner kitchen experience.
Beyond its ease of use, the Stack & Snap boasts a powerful motor and versatile attachments. The reversible slice/shred disk allows for various textures, while the chopping S-blade locks securely into the bowl, staying put even when pouring out ingredients. Cleanup is also a breeze, as all blades, the bowl, and the lid are dishwasher safe. With convenient cord storage, it keeps your countertops tidy when not in use. It’s truly a kitchen essential that simplifies holiday baking and everyday meal prep, making it a valuable addition to any home.
Hamilton Beach Stack & Snap 10 Cup Food Processor Features:
- Easy stack & snap assembly – no difficult twisting or locking.
- Unique, patent-pending design for hassle-free setup.
- Simple function guide to indicate the correct blade and button for your task.
- Big Mouth® feed tube to minimize pre-cutting of ingredients.
- Sealed bowl design to prevent leaks and spills.
- Powerful 450-watt motor for efficient processing.
- Reversible slice/shred disk for various cutting options.
- Chopping S-blade that securely locks into the bowl during use and pouring.
- Dishwasher-safe blades, bowl, and lid for effortless cleanup.
- Integrated cord storage for a clutter-free countertop.
Your Go-To Holiday Oreo Truffles Recipe
Now that you’re equipped with the knowledge of how simple and rewarding these truffles are to make, it’s time to dive into the recipe itself. Get ready to create a holiday treat that will impress everyone with minimal effort. This recipe yields a generous batch, perfect for sharing, gifting, or enjoying throughout the festive season. Remember, the key to perfect truffles lies in the quality of your ingredients and a little bit of chilling time.
- 1 package (approximately 15.3 oz) of Holiday Winter Oreos
- 1 (8 oz) package cream cheese, softened to room temperature, cut into chunks
- 16 oz. chocolate candy melts (milk chocolate, white chocolate, or dark chocolate work well)
- Prepare your workspace: Lay a long sheet of wax paper or parchment paper over a large cookie sheet and set it aside.
- Crush the Oreos: Place the whole Oreo cookies into a food processor and pulse until they are finely crushed into crumbs. For a garnish, reserve a small amount of these crumbs (about 2 tablespoons) in a separate bowl if desired. (If you don’t have a food processor, you can place the Oreos in a large Ziploc bag, seal it tightly, and crush them with a rolling pin until fine.)
- Combine with cream cheese: Add the softened cream cheese chunks to the food processor with the Oreo crumbs. Pulse again until the mixture is evenly moistened and forms a cohesive “dough.” It should be firm enough to roll.
- Form the truffles: Scoop out the mixture and roll it into 1-inch balls. Don’t worry if they are a little messy at this stage; they’ll be coated in chocolate soon! Arrange the formed balls on your prepared cookie sheet.
- Chill the truffles: Place the cookie sheet with the truffle balls into the freezer for at least 10 minutes. This step is crucial for helping them hold their shape and preventing the chocolate coating from melting them.
- Melt the chocolate: While the truffles are chilling, melt the chocolate candy melts according to the package directions. Be very careful not to scorch the chocolate. If using a microwave, heat in 20-second intervals, stirring thoroughly after each interval, until smooth and fully melted.
- Coat the truffles: Remove the chilled truffles from the freezer. Using two forks, a spoon, or a toothpick, carefully dip each truffle into the melted chocolate, ensuring it’s completely coated. Gently tap off any excess chocolate. You might need a little more chocolate than the initial 16 oz, depending on the size of your truffles and how thickly you coat them.
- Garnish and set: Return the coated truffles to the baking sheet. Immediately sprinkle the tops with the reserved crushed Oreo crumbs (if using) before the chocolate sets. Allow the chocolate coating to fully harden at room temperature or in the refrigerator.
- Store: Once the chocolate has set, store the Holiday Oreo Truffles in an airtight container in the refrigerator to keep them fresh.
Tips for Perfect Holiday Truffles
- Room Temperature Cream Cheese: Ensure your cream cheese is truly softened. This makes it much easier to blend smoothly with the Oreo crumbs, preventing lumps.
- Evenly Crushed Oreos: A food processor makes this effortless, but if crushing by hand, aim for very fine crumbs for a consistent truffle texture.
- Chill Time is Key: Don’t skip the freezer step. Cold truffles are essential for a smooth dipping process and to prevent them from falling apart in the warm chocolate.
- Chocolate Melting: Go low and slow when melting chocolate. Overheating can cause it to seize or burn. If it becomes too thick, a tiny bit of coconut oil or shortening can help smooth it out (check candy melt specific instructions).
- Dipping Technique: Use a fork or a dipping tool to lower the truffle into the chocolate. Lift it out, tap gently on the side of the bowl to remove excess, and use a second fork or toothpick to help slide it back onto the wax paper.
- Get Creative: While the classic is unbeatable, feel free to experiment! Drizzle with white chocolate, sprinkle with holiday nonpareils, or use other flavored Oreos for different occasions (e.g., mint for St. Patrick’s Day, lemon for spring).
- Storage: These truffles keep well in the refrigerator for up to a week, making them ideal for making ahead of time.
These Holiday Oreo Truffles are not just a recipe; they are a delightful tradition waiting to happen in your home. Their simplicity, combined with their festive flavor, makes them an absolute winner for any holiday gathering or a cozy night in. And with the help of a reliable kitchen companion like the Hamilton Beach Stack & Snap Food Processor, you’ll find the process so enjoyable that you’ll want to make them year after year.
So, gather your ingredients, enlist your favorite kitchen gadget, and prepare to create a batch of these irresistible 3-ingredient truffles. They’re guaranteed to bring smiles, satisfy sweet cravings, and add a touch of effortless magic to your holiday season. Happy baking (and no-baking)!