
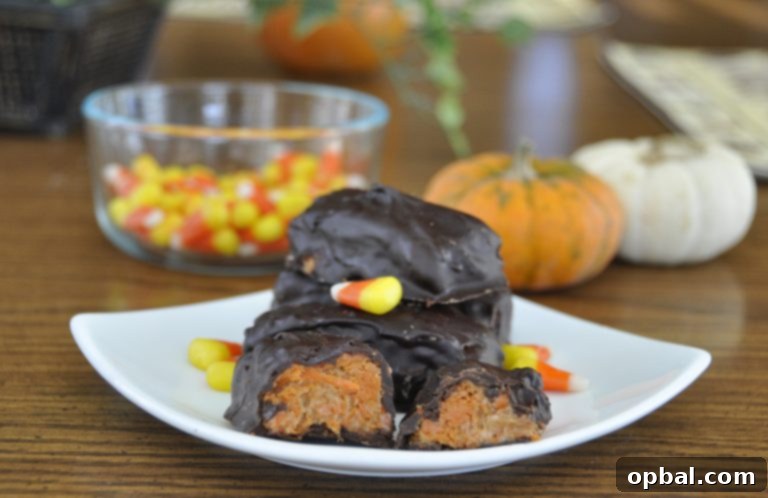
Unlock the Secret to Homemade Butterfingers: Just 3 Ingredients for Crispy, Crunchy Perfection
For many of us, the iconic Butterfinger candy bar holds a special place in our hearts – a delightful symphony of crispy, flaky peanut butter goodness enrobed in smooth chocolate. The very thought conjures memories of Halloween hauls, movie nights, and satisfying sweet cravings. But what if we told you that recreating this beloved classic in your own kitchen is not only possible but incredibly simple? Prepare to be amazed, because with just three humble ingredients, you can whip up a batch of homemade Butterfingers that rival the original in every crispy, crunchy, and absolutely delicious bite. Yes, you read that right – only three ingredients stand between you and a truly unforgettable candy-making experience!
The Unbelievable Secret Ingredient: Candy Corn’s Transformative Power
When I first stumbled upon a recipe claiming to replicate Butterfingers with melted candy corn, my initial reaction was pure skepticism. Candy corn, the polarizing autumnal treat, turning into the distinctive, flaky texture of a Butterfinger? It sounded almost too good, or rather, too strange, to be true. Like many, I associated candy corn with its sugary, waxy consistency, far removed from the peanut-butter crunch I adored. However, curiosity, as they say, killed the cat – or in this case, led to a revelation!
The magic truly unfolds when the candy corn is melted. It undergoes a remarkable transformation, caramelizing into a pliable, sticky base. When combined with creamy peanut butter, this mixture sets into a brittle, aerated texture that perfectly mimics the unique crispiness of a store-bought Butterfinger. This unexpected culinary alchemy is what makes this recipe so incredibly ingenious and utterly delicious. It’s a testament to how simple ingredients, when used creatively, can yield astonishing results that will leave you questioning everything you thought you knew about candy making. This isn’t just a trick; it’s a genuine culinary hack that unlocks a world of homemade candy possibilities, proving that sometimes, the most surprising ingredients hold the key to extraordinary flavors.
Reliving Childhood Favorites: Why Butterfingers Hold a Special Place
Growing up, Butterfingers were, without a doubt, my absolute favorite candy bar. They always topped my Halloween candy trade lists – I’d happily barter two Reese’s Cups for just one precious Butterfinger, that’s how much I adored them! There was something about the perfect balance of sweet, salty peanut butter, the slight flakiness, and the rich chocolate coating that made them utterly irresistible. They were closely followed by other classics like Skittles and Snickers, but Butterfingers always reigned supreme in my candy hierarchy.
The joy of making these homemade versions isn’t just about the taste; it’s about recapturing that nostalgic feeling. It’s about bringing a beloved childhood memory to life in your own kitchen, creating new memories with friends and family. The authentic flavor profile of these homemade bars is truly uncanny, so spot-on that it brought back all those treasured moments with every bite. It’s an experience that transcends mere eating – it’s a journey back to simpler, sweeter times, made possible with just a few ingredients and a little bit of kitchen magic. Imagine the delight on your loved ones’ faces when they discover these familiar flavors in a treat made with your own hands.
Effortless Indulgence: The Simplicity of 3-Ingredient Butterfingers
Beyond their incredible taste, one of the greatest appeals of these homemade Butterfingers is their sheer simplicity. You don’t need to be a seasoned pastry chef or an expert baker to achieve spectacular results. This recipe is genuinely foolproof, designed for anyone who craves a delicious treat without the fuss. When I first made them, I frankly didn’t trust myself to be alone with them for too long – they’re *that* addictive! I strategically timed their creation for when I had company coming over, ensuring I had willing tasters to share the irresistible goodness.
During a recent visit from four good friends, these Butterfingers were an absolute hit. Their enthusiasm was palpable; they genuinely enjoyed them as much as I did, confirming that the taste and texture are truly indistinguishable from the store-bought version. The ease of preparation, coupled with the impressive outcome, makes this recipe perfect for entertaining, satisfying last-minute cravings, or even as a thoughtful homemade gift. You’ll find yourself planning to stock up on candy corn, just as I am, so you can enjoy these delightful treats year-round. It’s a game-changer for anyone looking for an easy, impressive, and utterly delicious dessert that never fails to please a crowd.
Achieving Perfection: Essential Tips for Your Homemade Butterfinger Bars
While this recipe is incredibly straightforward, a few key tips can help ensure your homemade Butterfingers turn out perfectly every time. Paying attention to these small details will elevate your candy-making experience and guarantee those signature crispy, crunchy results that everyone will rave about.
Melting the Candy Corn: Gentle and Even
The first crucial step is melting the candy corn. It’s important to do this gently in a microwave-safe bowl, in 30-second increments, stirring thoroughly after each burst. This prevents scorching and ensures a smooth, consistent melt. You want it completely liquid and lump-free before moving on to the next step. Patience here is key – don’t rush the process, or you might end up with a grainy or uneven texture that won’t give you that authentic Butterfinger flakiness. The goal is a uniform, molten candy corn base.
Incorporating the Peanut Butter: Smooth Operator
Once your candy corn is perfectly melted, add the creamy peanut butter to the bowl. Stir continuously until the peanut butter is fully incorporated and the mixture is entirely smooth and uniform. This blend is what forms the iconic crispy, peanut butter core of your Butterfingers. Ensure there are no streaks of peanut butter; it should be one cohesive, delicious mass. Press it firmly into your wax paper-lined pan to create a compact base, which helps with clean, precise cutting later. Using creamy peanut butter is essential here; natural or separated peanut butter might alter the texture.
Chilling and Cutting: The Perfect Shape
Don’t skimp on the freezer time for the base. Ten to twenty minutes is usually sufficient to make it firm enough to cut cleanly without crumbling. When cutting, use a sharp knife and clean it occasionally to prevent sticking and ensure smooth edges. You can cut them into traditional mini candy bar sizes or any shape you desire – bite-sized squares are also fantastic for sharing and make for elegant serving. Uniformity in size also helps with even chocolate coating.
Dipping in Chocolate: The Art of the Coat
Melting the chocolate also requires care. Use the same 30-second microwave increments, stirring well each time, until it’s smooth and fluid. For dipping, a fork is your best tool. Submerge each bar completely, then gently tap the fork against the side of the bowl to remove excess chocolate. This ensures a thin, even coating that sets beautifully and avoids a clumpy texture. If your chocolate starts to thicken, a quick 10-15 second zap in the microwave will bring it back to dipping consistency. Consistency in your chocolate coating will prevent it from becoming too thick or cracking when bitten, preserving the delicate crispness of the interior.
Final Chill and Storage: Crispness Preserved
A final short chill in the freezer after dipping helps the chocolate set quickly and ensures your Butterfingers are firm and ready to enjoy. These homemade delights are best stored in an airtight container in the refrigerator to maintain their crisp texture and extend their freshness, though they are also perfectly enjoyable at room temperature for immediate consumption. But be warned: they have a tendency to disappear quickly, so plan accordingly!
3-Ingredient Homemade Butterfingers Recipe
A truly phenomenal recipe for homemade Butterfingers that captures the exact crispy, crunchy texture and rich peanut butter flavor of the beloved classic candy bar, all with incredible ease and just three simple ingredients.
Recipe Type: Dessert
Cuisine: American
Author: Ashley (Adapted)
Prep time: 30 minutes
Total time: 30 minutes (plus chilling time)
Yields: Approximately 25 mini bars
Ingredients
- 16 ounces (approx. 2 ¾ cups) Candy Corn
- 16 ounces (approx. 2 cups) Creamy Peanut Butter (ensure it’s not natural, oil-separated peanut butter for best results)
- 3 cups Milk or Dark Chocolate Chips (or your preferred melting chocolate, like baking wafers or compound chocolate)
Instructions
- Prepare your pan: Line an 8×8 or 9×9 inch baking pan with wax paper or parchment paper, ensuring extra overhang on the sides for easy lifting. This prevents sticking and makes removal simple.
- Melt the candy corn: In a medium, microwave-safe bowl, melt the candy corn. Microwave in 30-second intervals, stirring vigorously after each interval, until the candy corn is completely melted and smooth. This typically takes 1.5 to 3 minutes, depending on your microwave’s wattage. Be patient and stir well to avoid hot spots and ensure an even, fluid consistency.
- Combine with peanut butter: Once the candy corn is fully melted and smooth, add the creamy peanut butter to the bowl. Stir continuously until the peanut butter is fully incorporated and the mixture is entirely smooth and uniform. This creates the crispy, peanut butter core of your Butterfingers.
- Chill the base: Pour the mixture into your prepared pan and use a spatula to spread it evenly. Smooth the top surface as much as possible. Place the pan in the freezer for 10-20 minutes, or until the mixture is firm enough to easily handle and cut without sticking.
- Prepare for dipping: While the base is chilling, line a large baking sheet with fresh wax paper or parchment paper. This will be where your chocolate-dipped bars will set after coating.
- Cut the bars: Once firm, remove the chilled peanut butter base from the pan by gently lifting the wax paper overhang. Place it on a cutting board and cut it into your desired bar sizes. Traditional Butterfingers are usually cut into small, rectangular bars, but feel free to make them mini, square, or any size you prefer.
- Melt the chocolate: In another medium, microwave-safe bowl, melt your milk or dark chocolate chips. Again, microwave in 30-second bursts, stirring well after each, until the chocolate is completely smooth and fluid. This typically takes 1-2 minutes.
- Dip the bars: Using a fork, gently dip each cut peanut butter bar into the melted chocolate, ensuring it’s fully coated. Lift the bar with the fork, allowing any excess chocolate to drip off by tapping the fork lightly against the rim of the bowl. This ensures a thin, even coating.
- Set the chocolate: Carefully place each chocolate-covered bar onto the wax paper-lined baking sheet. Continue this process until all your homemade Butterfingers are dipped. (If your chocolate begins to thicken or cool, simply return it to the microwave for 10-15 seconds and stir to re-liquefy. Do this as needed throughout the dipping process.)
- Final chill and serve: Once all bars are dipped, place the baking sheet back into the freezer for an additional 5-10 minutes to allow the chocolate coating to fully set and harden. Serve your homemade Butterfingers chilled from the refrigerator or at room temperature. Enjoy your incredibly authentic and delicious creation – a true testament to simple ingredients yielding extraordinary results!
Beyond the Bite: Serving and Gifting Your Homemade Treats
These homemade Butterfingers are not just for personal indulgence; they make fantastic gifts and party treats. Arrange them beautifully on a platter for guests at your next gathering, or package them in small cellophane bags tied with festive ribbons for a charming homemade present. They are perfect for holiday gift baskets, bake sales, school events, or simply as a thoughtful gesture for friends and loved ones who appreciate a unique, handcrafted treat. Their distinctive flavor and satisfying texture always spark conversation and delight, making them a memorable addition to any occasion. Consider crushing a few of them to use as a topping for ice cream sundaes, milkshakes, or even cupcakes for an extra layer of Butterfinger magic!
Your New Go-To Candy Recipe Awaits!
So there you have it – a remarkably simple, incredibly delicious, and truly authentic recipe for homemade Butterfingers. Gone are the days of complex candy-making or settling for store-bought when a craving strikes. With just three ingredients and a minimal amount of effort, you can create a treat that will impress everyone and satisfy even the most ardent Butterfinger connoisseur. Don’t let initial skepticism deter you; embrace the magic of candy corn and prepare to fall in love with your new favorite homemade candy. Whether you’re making them for yourself, for a party, or as a thoughtful gift, these 3-ingredient Butterfingers are guaranteed to be a hit. Happy candy making!
Recipe inspiration from: tastykitchen.com