
My Favorite Cut-Out Sugar Cookies: The Ultimate Holiday Recipe for Super Soft Perfection

The aroma of freshly baked cookies is, for many, the very essence of the holiday season. It evokes cherished memories, brings families together, and fills homes with an unparalleled warmth. Among all the festive treats, cut-out sugar cookies hold a special place in my heart – and, I believe, in countless others. For years, I’ve kept my most treasured family recipe a closely guarded secret, but the time has finally come to share with you what I truly believe is the **best cut-out sugar cookie recipe** you’ll ever encounter. This isn’t just a recipe; it’s a legacy, a tradition that has spanned generations in my family, ensuring perfectly soft, delightfully buttery, and irresistibly sweet cookies every single time. Prepare to discover the magic behind the ideal cookie that holds its shape, bakes beautifully, and tastes absolutely divine.
A Journey Through Sweet Memories: My Childhood Tradition
There’s something uniquely magical about baking with family, especially during the holidays. My earliest and fondest memories are steeped in the joy of making these exact cut-out sugar cookies with my mom and brother, Justin. Every year, without fail, we would dedicate an entire weekend day to this delightful endeavor. Our kitchen would transform into a festive wonderland, overflowing with flour, sugar, and an endless array of cookie cutters. We’d roll out batch after batch of the buttery dough, meticulously cutting out stars, trees, gingerbread men, and countless other shapes. The sheer volume of cookies we produced was always astounding, but the process was never about the quantity; it was about the laughter, the shared moments, and the vibrant creativity of decorating each cookie with an explosion of colors and sprinkles. These weren’t just cookies; they were edible canvases, each one a tiny masterpiece crafted with love and holiday spirit. This tradition instilled in me a deep appreciation for homemade treats and the power of food to connect us.
Mastering the Art: The Perfect Cookie and Frosting Pairing
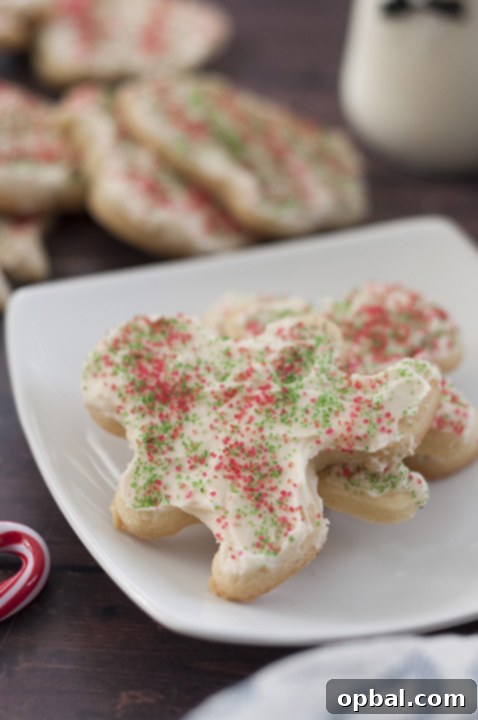
While the cookie recipe itself remained a constant, a treasured heirloom passed down through my family, my taste buds evolved over the years, leading me on a quest for the perfect accompaniment: the ideal frosting. My mom’s frosting was always delicious, don’t get me wrong, but I yearned for something with a bit more body, a richer flavor profile that would truly elevate these already incredible cookies. After much experimentation, I finally discovered a buttercream frosting recipe that is, dare I say, absolutely perfect. This creamy, dreamy frosting provides a luscious complement to the delicate sweetness of the sugar cookies, creating a harmonious balance that is truly addictive. The moment I paired these two together, I knew I had unlocked the secret to the ultimate cut-out sugar cookie experience. It was a revelation! I simply couldn’t stop at just one, and honestly, who could blame me? This combination isn’t just good; it’s a triumph, a testament to perfecting a classic.
What sets these cookies apart? They are exquisitely buttery, with a subtle sweetness that never overwhelms. One of their most remarkable qualities is how impeccably the dough holds its shape during baking. There’s no disheartening spread, no blurred edges – just perfectly defined shapes emerging from the oven, ready for their glorious frosting. Each bite offers an almost melt-in-your-mouth quality, a tender crumb that is simply irresistible. This is not a hard, crunchy cookie; it’s a soft, tender delight that practically dissolves on your tongue. For optimal texture and flavor, I highly recommend rolling the dough out to a generous thickness. This ensures a substantial cookie that remains wonderfully soft, even after cooling and decorating. Trust me, your family and friends will be begging for this recipe!

Embracing Holiday Traditions (Even Early Ones!)
Do you have those special holiday traditions that you eagerly anticipate each year? For me, nothing quite compares to the joy of baking cookies with my mom and adorning our home with festive Christmas decorations. The memories forged during those times are truly priceless, and the feeling of warmth and togetherness is something I carry with me throughout the year. In fact, my love for these traditions runs so deep that once I had my own home, I’ve been known to kick off the Christmas decorating festivities as early as mid-October! There’s a certain liberating joy in setting your own holiday schedule, isn’t there? Nobody can tell you when it’s “too early” to embrace the festive spirit when it’s your own space!
Beyond these classic cut-out sugar cookies, our family holiday baking repertoire also included other beloved recipes like my Walnut Snowball Cookies and exquisite Italian Chocolate-Dipped Almond Horns. Each recipe carries its own set of cherished memories, contributing to the rich tapestry of our holiday celebrations. These are the tastes and smells that define the season for me.
Indulging in the Spirit of the Season
Some might call me crazy for decking the halls and listening to Christmas music in early November, but I wouldn’t have it any other way. As I write this, nestled comfortably in the first week of November, surrounded by the twinkling lights of my beautifully decorated Christmas tree, with a plate of these irresistible cut-out sugar cookies (or perhaps five!) beside me, I feel utterly content. If celebrating Christmas early brings this much joy, then I wholeheartedly embrace being “wrong”! The sheer delight of these simple pleasures is a reminder to savor every moment of the holiday season, whenever it begins for you.
If you, like me, appreciate the timeless charm of cherished family recipes, I encourage you to explore more of our holiday favorites. Be sure to try my incredibly easy Christmas Rum Balls or the tender, delicate Italian Ricotta Cookies. And for another delightful treat, check out these delicious Maple Cookies from my talented friend, Holly. There’s truly nothing quite like the magic of holiday traditions, especially when they involve delicious homemade treats!
Tips for Perfect Cut-Out Sugar Cookies Every Time
Achieving bakery-quality cut-out sugar cookies at home is entirely within your reach with a few key techniques. Here are some essential tips to ensure your cookies turn out perfectly soft, perfectly shaped, and utterly delicious:
- Quality Ingredients are Key: Start with good quality unsalted butter, fresh eggs, and pure vanilla extract. These ingredients form the foundation of your cookie’s flavor. Make sure your butter is at true room temperature for optimal creaming.
- Don’t Skimp on Chilling: Chilling the dough for at least an hour (or even overnight!) is crucial. This not only makes the dough easier to handle, preventing stickiness, but also helps to prevent the cookies from spreading excessively in the oven, ensuring your intricate cut-out shapes remain sharp and defined.
- Roll Evenly and Generously: Aim for an even thickness when rolling out your dough, ideally around 1/4 to 3/8 inch. Rolling them too thin will result in crispier, harder cookies, while a slightly thicker roll will yield that desirable soft, melt-in-your-mouth texture we love. Use a lightly floured surface and rolling pin, but don’t over-flour.
- Flour Your Cutters: Dip your cookie cutters in flour before each cut. This prevents sticking and helps you achieve clean, crisp edges on your cookie shapes.
- Mind the Baking Time: Sugar cookies bake relatively quickly. Keep a close eye on them, especially during the last few minutes. You’re looking for edges that are just barely golden, not deeply browned. Overbaking will lead to a dry, hard cookie. My recipe calls for 8-10 minutes; start checking at 8 minutes.
- Cool Properly: Allow the cookies to cool on the baking sheet for a few minutes before carefully transferring them to a wire rack to cool completely. This helps them firm up without breaking. Never try to frost warm cookies, as the frosting will melt!
- Perfecting Your Buttercream: For the frosting, ensure your butter is softened to room temperature for a smooth, lump-free consistency. Add milk gradually to achieve your desired spreadable texture. For vibrant colors, use gel food coloring for best results.
- Decorate with Joy: Let your creativity shine! Use a variety of sprinkles, edible glitters, or different colored frostings. Baking these cookies is as much about the fun of decorating as it is about the taste.
Frequently Asked Questions About Cut-Out Sugar Cookies
- Q: Why do my sugar cookies spread in the oven?
- A: Spreading is often due to warm dough or too much butter/not enough flour. Ensure your dough is thoroughly chilled (at least 1 hour, preferably longer) and avoid handling it too much before baking. Also, make sure your butter isn’t *too* soft when creaming, and measure your flour accurately.
- Q: Can I make the dough ahead of time?
- A: Absolutely! The dough can be prepared up to 3-4 days in advance and stored tightly wrapped in plastic in the refrigerator. You can also freeze the dough for up to 3 months. Thaw in the refrigerator before rolling.
- Q: How do I store frosted sugar cookies?
- A: Once frosted and set, store the cookies in an airtight container at room temperature for up to 5-7 days. If stacking, place parchment paper between layers to prevent sticking.
- Q: Can I freeze baked sugar cookies?
- A: Yes! Baked, unfrosted cookies freeze beautifully for up to 3 months. Wrap them tightly in plastic wrap and then place them in an airtight container or freezer bag. Thaw at room temperature before frosting. Frosted cookies can also be frozen, but stack them carefully once the frosting is completely set.
- Q: What if my frosting is too thick or too thin?
- A: If your buttercream frosting is too thick, add more milk, a tiny bit at a time (1/2 teaspoon), until it reaches the desired consistency. If it’s too thin, you can add more powdered sugar, a tablespoon at a time, until it thickens up.
- Cookies:
- 3 cups all-purpose flour
- 1 cup granulated sugar
- 1 cup unsalted butter, softened
- 1 large egg
- 1 ½ teaspoons baking powder
- 1 ½ teaspoons pure vanilla extract
- ½ teaspoon sea salt
- Buttercream Frosting:
- 2 cups powdered sugar (confectioners’ sugar)
- ½ cup unsalted butter, softened to room temperature
- 1 teaspoon pure vanilla extract
- 1 ½ – 2 Tablespoons milk (dairy or non-dairy, as needed for consistency)
- Food coloring, gel or liquid, if desired
- Sprinkles, edible glitter, or other decorations, if desired
- In the bowl of a stand mixer fitted with the paddle attachment, or with a hand mixer, cream together the softened butter and granulated sugar until the mixture is light, fluffy, and pale in color. This usually takes 2-3 minutes.
- Add the large egg and pure vanilla extract, mixing on low speed until just combined. Be sure to scrape down the sides of the bowl with a spatula as needed to ensure everything is fully incorporated.
- In a separate medium-sized mixing bowl, whisk together the all-purpose flour, sea salt, and baking powder until well combined.
- Gradually add the dry ingredient mixture to the wet ingredients in small increments, mixing on the lowest speed until the flour is just incorporated and a soft dough forms. Be careful not to overmix, as this can lead to tough cookies.
- Divide the dough into two equal portions, flatten each into a disc, wrap tightly in plastic wrap, and chill in the refrigerator for at least 1 hour. Chilling for 2-3 hours, or even overnight, is highly recommended for best results, as it prevents spreading and makes the dough easier to handle.
- Once the dough is thoroughly chilled, preheat your oven to 350ºF (175ºC). Prepare baking sheets by lining them with parchment paper or silicone baking mats.
- On a lightly floured surface, roll out one disc of chilled dough to your preferred thickness. For super soft cookies that hold their shape, aim for approximately 1/4 to 3/8 inch thick. Avoid rolling too thin, as this can result in crispy cookies.
- Using your favorite cookie cutters, cut out shapes from the rolled dough. Carefully transfer the cut-out cookies to the prepared baking sheets, leaving about 1 inch between each cookie. Re-roll any dough scraps, chilling briefly if it becomes too warm, and continue cutting.
- Bake for 8-10 minutes, or until the edges are just barely golden. The centers should still look pale and set. Check at the 8-minute mark, as oven temperatures can vary.
- Remove the cookies from the oven. Let them cool on the baking sheet for 5-7 minutes until they are firm enough to transfer without breaking. Then, carefully move them to a wire cooling rack to cool completely before frosting.
- In the bowl of a stand mixer fitted with the paddle attachment, or with a hand mixer, cream together the softened unsalted butter, powdered sugar, and pure vanilla extract until light and fluffy. Start on low speed to avoid a cloud of powdered sugar, then increase to medium-high.
- Gradually add the milk, starting with 1 ½ tablespoons, a little at a time, mixing until the frosting reaches a smooth, spreadable consistency. If it’s too thick, add a tiny bit more milk; if too thin, add a bit more powdered sugar.
- If desired, divide the frosting into separate bowls and dye with food coloring to achieve various festive colors.
- Once the cookies are completely cool, spread the buttercream frosting evenly over each cookie.
- Decorate immediately with sprinkles, edible glitter, or other festive embellishments while the frosting is still wet.
- Allow the frosting to set for about 30 minutes before storing or stacking.
- Enjoy your beautiful and delicious homemade cut-out sugar cookies!